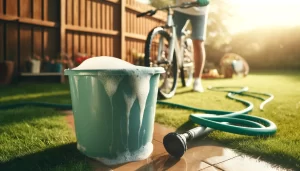
Wash your bike with ease and efficiency using a water jet, and you’ll not only save time but also enhance your bike’s performance and lifespan. Keeping your bicycle clean is not just about aesthetics; it’s about maintaining its function and ensuring every ride is smooth and enjoyable.
Whether you’re returning from a muddy trail ride or just performing regular upkeep, learning to properly use a water jet can make your cleaning routine both effective and swift. In this article, we dive into the best practices for using a water jet to quickly and safely clean your bicycle.
We’ll cover everything from choosing the right equipment to the step-by-step process that will prevent damage to sensitive parts of your bike. Join us as we explore how to keep your cherished two-wheeler in pristine condition, ensuring it’s always ready for your next adventure.

Image Source: Image Generated With DALL-E on ChatGPT
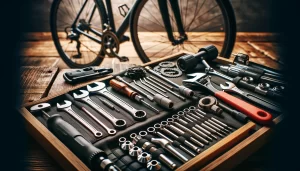
Best Water Jet Equipment for Cleaning Bicycles
When choosing the best water jet equipment for cleaning bicycles, it’s crucial to consider pressure, nozzle type, and ease of use. High-pressure washers can quickly remove dirt and grime but must be used carefully to avoid damage.
Look for a washer with adjustable pressure settings and a fan nozzle to disperse water over a wider area, reducing the risk of harming delicate components. Portable models are great for cyclists who need to clean their bikes on the go.
Step-by-Step Guide to Using Water Jet Equipment:
- Set Up: Connect your water jet equipment to a water source and power supply.
- Choose the Right Nozzle: Select a fan nozzle for a gentle wash.
- Adjust Pressure: Start at a lower pressure and increase as needed.
- Pre-rinse: Quickly rinse the bike to remove loose dirt.
- Focus on Tough Areas: Use a controlled spray to target mud and grime.
- Rinse Off: Thoroughly rinse the bike with clean water.
- Dry: Use a soft cloth or let the bike air dry.
Precautions When Using a Water Jet on Bicycles
Using a water jet to clean a bicycle can be effective but requires certain precautions to prevent damage. The intensity of the water jet can force water into bearings and other sensitive areas, leading to potential issues like rust or degraded performance.
It’s important to keep the nozzle at a safe distance and use a moderate pressure setting. Also, avoid directly spraying into areas where water can seep into the internal mechanisms of the bike.
Tips for Safe Use of Water Jets on Bicycles:
- Avoid High Pressure: Keep the pressure moderate to prevent forcing water into sensitive components.
- Maintain Distance: Hold the nozzle at least a foot away from the bike.
- Focus on Non-sensitive Areas: Direct the water flow on the frame and tires, not directly on bearings or the chain.
- Use the Right Angle: Spray at a 45-degree angle to efficiently remove dirt without driving it deeper into the bike.
- Dry Properly: After washing, ensure the bike is thoroughly dried to avoid moisture buildup in components.
Step-by-Step Guide for Efficient Bicycle Cleaning with a Water Jet
Cleaning your bicycle with a water jet can be an efficient and satisfying process, especially if you follow a systematic approach. First, it’s essential to use a suitable water jet system that allows for pressure adjustments.
Start by pre-wetting the bike to loosen dirt. Apply a bike-specific detergent, if necessary, and use the water jet to methodically clean the bike from top to bottom, focusing on dirty areas but avoiding direct high-pressure on sensitive parts like bearings and the chain.
Step-by-Step Efficient Cleaning with a Water Jet:
- Preparation: Position your bike in an open space and gather all necessary tools.
- Pre-Rinse: Lightly rinse your bicycle to remove any loose surface dirt.
- Apply Cleaner: If using, spray a bicycle-specific cleaner and let it sit for a few minutes.
- Wash: Use the water jet starting from the top and moving downwards, ensuring you cover all parts including wheels and undercarriage.
- Sensitive Parts: Use a lower pressure setting for areas like hubs, chain, and gears.
- Final Rinse: Thoroughly rinse off all soap and loosened dirt with clear water.
- Inspect: Look over the bike for any missed spots and re-clean if necessary.
Tips for Quick Drying After Washing with a Water Jet
Quickly drying your bicycle after washing with a water jet is crucial to prevent water spots and potential rust. Using the right techniques can significantly speed up the process while ensuring your bike’s longevity. After rinsing, shake off excess water, then use a clean microfiber towel to absorb moisture efficiently. Avoid letting your bike dry in direct sunlight as it can damage some components.
Quick Drying Tips After Washing:
- Remove Excess Water: Shake off water or use a squeegee to help remove droplets from the frame and wheels.
- Towel Dry: Use microfiber towels to gently dry off the bike. These towels are highly absorbent and soft, reducing the risk of scratching the paint.
- Use Compressed Air: If available, use compressed air to blow water out of hard-to-reach nooks and crannies.
- Turn the Bike: Rotate your bike and tilt it to ensure water trapped in crevices drains out.
- Final Air Dry: Let your bike sit in a well-ventilated area to air dry completely before storing it or applying lubricants.
- Lubricate: Once dry, apply lubricant to the chain and other moving parts to prevent rust and ensure smooth operation.
How to Prevent Corrosion During Washing with a Water Jet
When using a water jet to clean a bicycle, the risk of corrosion is a significant concern, particularly for components susceptible to water damage such as bearings, chains, and metal parts. Corrosion can occur when water infiltrates small crevices and is not adequately removed, leading to rust and degradation over time.
To combat this, it’s crucial to use a gentle water flow and avoid directly targeting sensitive areas with high pressure. Furthermore, ensuring the bike is correctly prepped before washing can protect these components; for example, covering them with waterproof materials or greasing them in advance can prevent water entry.
After washing, immediate and thorough drying plays a vital role in preventing corrosion. Using an air compressor to blow out water from hard-to-reach places and wiping down the bike with an absorbent towel helps eliminate moisture before it can cause harm.
Additionally, it’s wise to inspect the bike for any water that might have settled in crevices or hidden spots. If the bike is frequently exposed to moisture, consider applying a water-displacing spray that can provide a protective coating to metal surfaces, thereby extending the life of the bike’s components and preventing rust.
Image Source: Image Generated With DALL-E on ChatGPT
The Importance of Lubrication After Washing the Bicycle
Lubrication after washing a bicycle is essential not only for smooth operation but also for protecting the bike from future corrosion and wear. Washing, especially with high-pressure water jets, can strip away existing lubricants from the chain, gears, and cables, which are critical for reducing friction and preventing the metal from wearing down.
Applying a high-quality lubricant after every wash restores these protective barriers and ensures that the moving parts operate efficiently. It is important to choose the appropriate type of lubricant based on the riding conditions—wet lubricants for moist environments and dry lubricants for dusty conditions.
In addition to enhancing performance, proper lubrication after washing helps in sealing out moisture that can lead to rust. By carefully applying lubricant to the chain, derailleur, and other pivot points, you create a barrier against moisture, which is especially crucial after exposure to water.
Make sure to wipe off any excess lubricant to prevent attracting dirt and grime, which can form a paste-like substance that wears down parts. Regular maintenance, including post-wash lubrication, not only extends the lifespan of the bicycle but also ensures that each ride is smooth and enjoyable, emphasizing the importance of this step in the bicycle care routine.
Frequently Asked Questions: Quick Cleaning – How to Wash Your Bicycle with a Water Jet
1. Can any type of bicycle be washed using a water jet?
Most bicycles can be safely washed with a water jet, but always use a gentle setting for bikes with delicate components or intricate designs, such as carbon fiber frames.
2. What pressure setting should I use on my water jet to clean my bike?
It’s best to start with a lower pressure setting and increase only if necessary. High pressures can force water into bearings and cause damage.
3. How do I protect sensitive parts of my bike during a water jet wash?
Use low pressure, avoid direct spraying into bearings and joints, and consider applying a waterproof grease or sealant to sensitive areas before washing.
4. What type of detergent should I use?
Choose a mild, biodegradable soap specifically designed for bicycles to avoid damaging the paint or components.
5. How often should I wash my bike with a water jet?
This depends on how frequently the bike is used and the conditions it’s exposed to. Generally, a thorough wash every few weeks is sufficient, but more frequent washes might be necessary in muddy or dusty conditions.
6. Can water from a jet wash cause rust?
Yes, if water remains in crevices or components post-wash. Thorough drying and appropriate lubrication after washing are crucial to prevent rust.
7. Is it necessary to lubricate the bike after every wash?
Yes, reapplying lubricant after every wash is essential to protect and maintain the bike’s moving parts, especially the chain and gears.
8. How long does it take to wash a bike using a water jet?
The entire process can be completed in about 15-30 minutes, depending on the bike’s condition and how meticulous you are with the cleaning and drying process.
In conclusion, washing your bicycle with a water jet is a highly efficient method to keep your bike looking great and functioning smoothly. It’s essential, however, to use the correct pressure settings and avoid direct high-pressure streams on sensitive parts of the bike to prevent damage.
Always follow up with thorough drying and lubrication to ensure that no moisture remains that could lead to rust or degradation of components.
Moreover, regular maintenance, including a proper wash routine, not only preserves the aesthetic appeal of your bicycle but also enhances its longevity and performance. With the right tools and techniques, you can ensure that your bike remains a reliable companion on your cycling adventures, keeping it ready and responsive for whatever path you choose to ride.
Did you like the article? Be sure to check out more content like this in the Maintenance Guide category or see more related content below.